CubeSat Simulator · Volume 5
The Usage — Vol 5
The Usage — Vol 5
Introduction
This final volume is operation: how to power the CubeSatSim up and down, what its LEDs are telling you, how to select each transmit mode, and — the part that makes it a satellite and not a blinking box — how to receive and decode its telemetry on a ground station. Everything here is drawn from the project’s own Quick Start and Ground Station guides.12
1. Power up, power down, charge
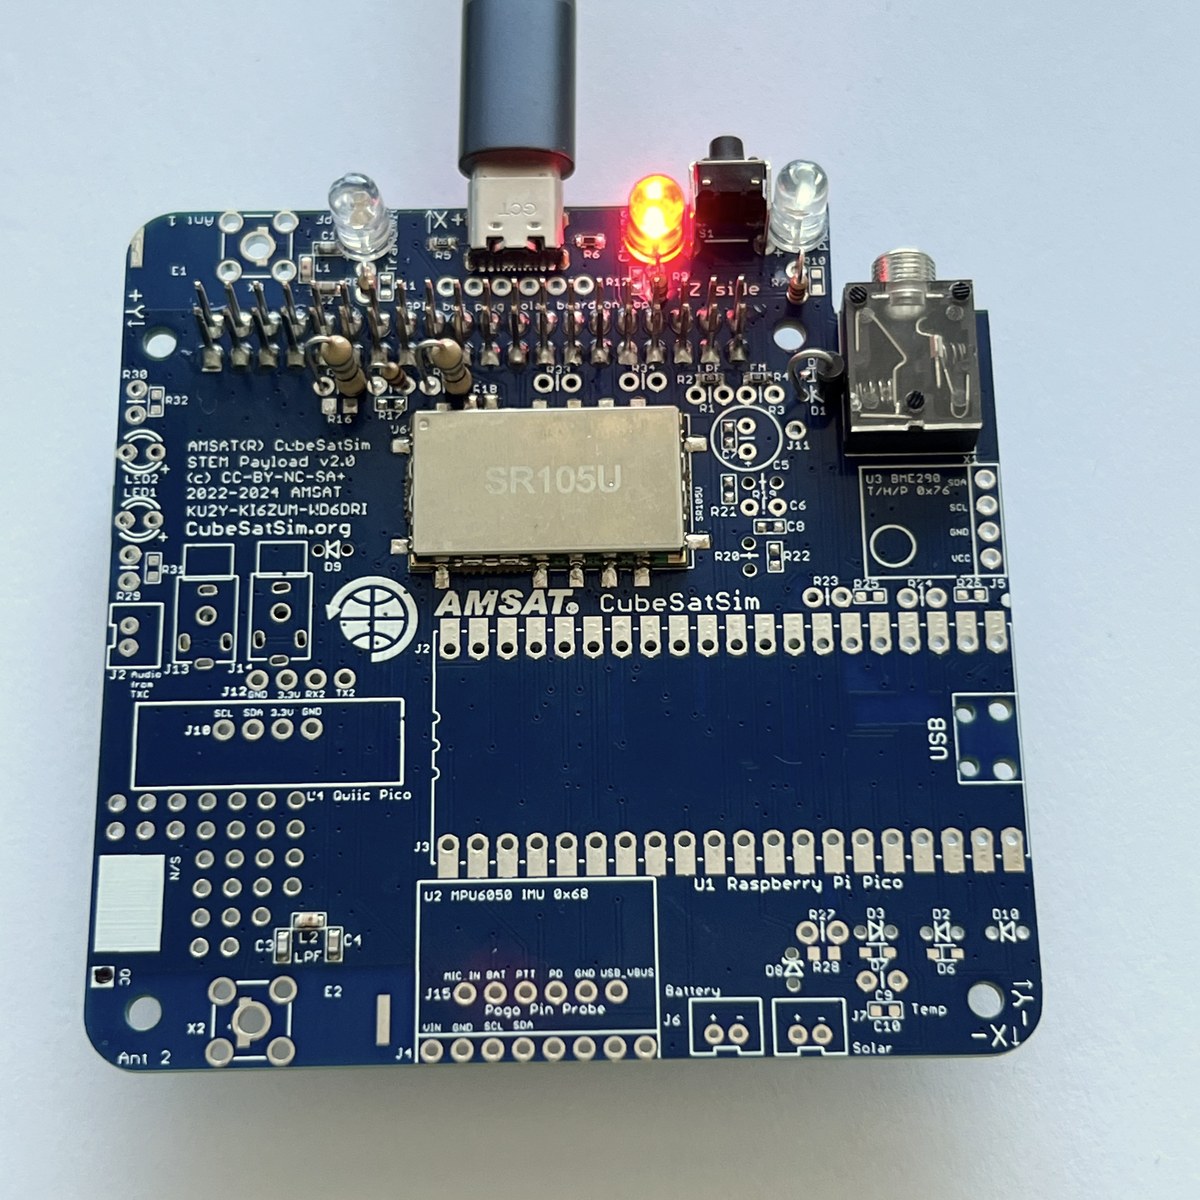
The CubeSatSim’s power behavior is governed by the Remove-Before-Flight (RBF) pin and the push-button, with the Green / Blue / Red LEDs as your status display.1
Turn on:
- If the RBF pin is inserted, simply pull it — the sim boots in ~30 seconds.
- If the RBF pin is already out, press and release the push-button; it boots in ~30 s. (If it won’t start, cycle the RBF pin; if still dead, the battery is flat — charge it.)
Turn off:
- Press and hold the push-button. The Green Power LED does a sequence of short blinks, then begins to blink slowly — release at the slow blink and the sim shuts down after ~30 s. When the Green and Blue LEDs are off, it’s down. Re-insert the RBF pin so the battery doesn’t slowly discharge in storage.
Charge:
- Plug a USB cable into the charging port — the Red Charging LED lights. Full charge takes several hours. Fastest charging is off, with the RBF pin in. (You can charge on or off, pin in or out.)
Table 1 — 1. Power up, power down, charge
| LED | Meaning |
|---|---|
| Green | Power / status (blink patterns during shutdown + mode change) |
| Blue | Transmit — lit while the radio is transmitting |
| Red | Charging |
2. The downlink — what you’ll hear
The CubeSatSim transmits on 434.9 MHz (it can drift ±5–10 kHz, so be ready to tune around). The Blue Transmit LED is lit whenever it’s on the air.1 At start-up and on every mode change it sends a CW (Morse) ID — “HI HI DE AMSAT by default or the one you configured on the Pi Zero during install. You can monitor it on any 70 cm FM radio/HT or on an RTL-SDR.
3. Selecting a transmit mode
The sim has six operating modes. To change mode, press and hold the push-button while the Green Power LED blinks, and release on the Nth blink to select mode N (see table). A quick press-and-release instead triggers a reboot (~1 minute). Each mode can also be set from the Raspberry Pi with a config command.12
Table 2 — 3. Selecting a transmit mode
| Blinks | Mode | What it is | Decode with | Pi command |
|---|---|---|---|---|
| 1 | APRS | AFSK packet (Bell-202), 1200 bps — terrestrial packet style | Direwolf / SoundModem / WebSDR “Packet” | config -a |
| 2 | FSK | DUV (Data-Under-Voice), emulates Fox-1C / AO-95; “rumbling” sound | FoxTelem — “FSK 200bps (Fox1)“ | config -f |
| 3 | BPSK | emulates Fox-1E / HuskSat-1; sounds like noise (demod USB) | FoxTelem — “BPSK 1200bps (Fox1E)“ | config -b |
| 4 | SSTV | Slow-Scan TV image in Scottie 2 format | QSSTV / MMSSTV / WebSDR | config -s |
| 5 | CW | 20 WPM Morse-code telemetry | fldigi (+ telem spreadsheet) | config -m |
| 6 | Cross-Band Repeater | repeats 70 cm uplink onto the 2 m (145 MHz) downlink | listen on 144.9 MHz FM | (see CBR guide) |
Note the two Fox formats differ: FSK is 200 bps (Fox-1), BPSK is 1200 bps (Fox-1E) — you must set the matching Telem Format in FoxTelem or it won’t lock.

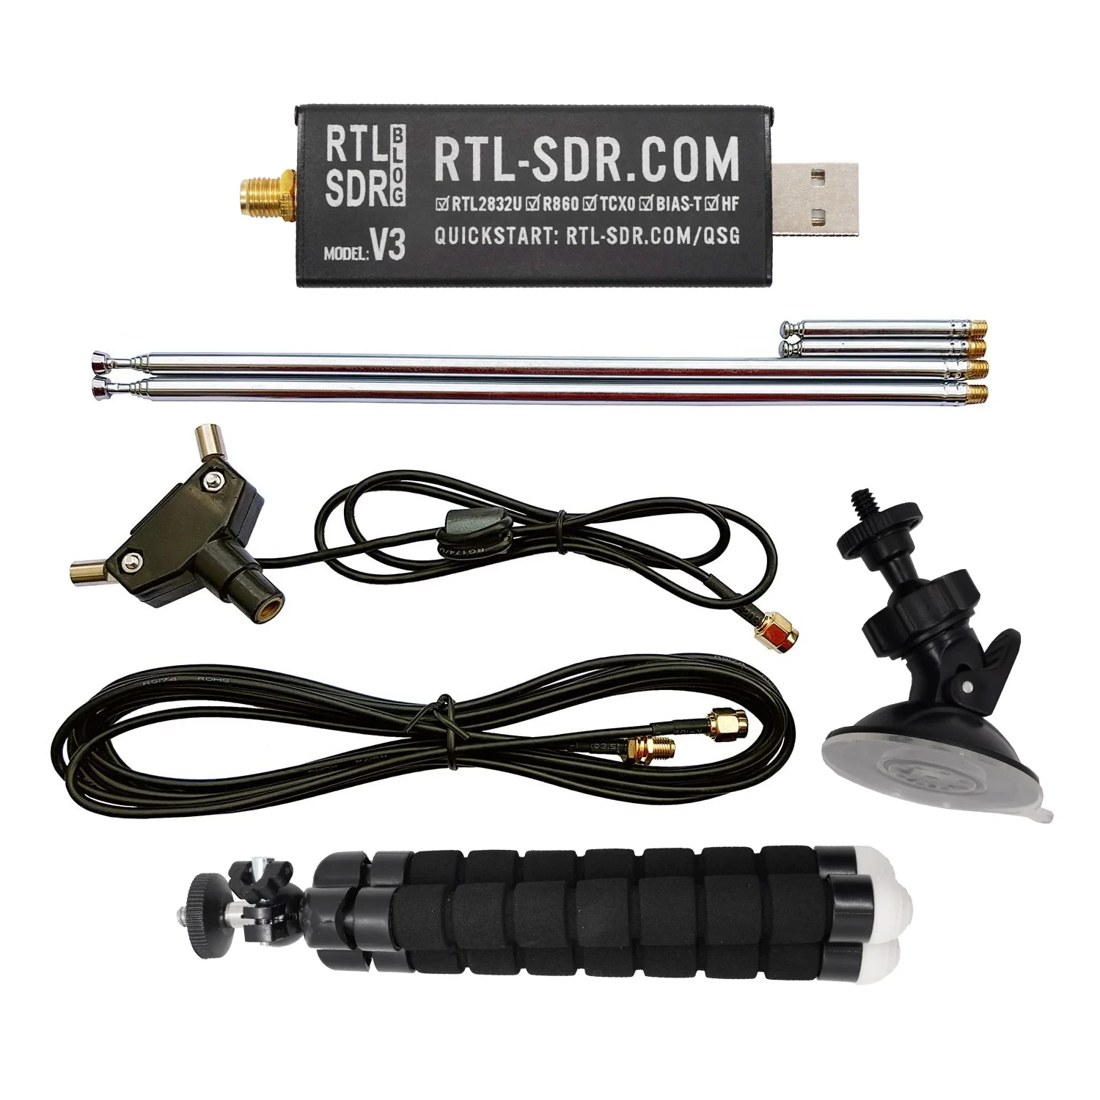
4. The ground station
The reference ground station is itself a Raspberry Pi running AMSAT’s pre-built image:2
- Raspberry Pi 3B or later (Pi 4/5 fine)
- RTL-SDR receiver + antenna (a ~$20 dongle)
- AMSAT “ARISS Pi” image on a micro-SD — it bundles FoxTelem, OpenWebRX/WebSDR, Direwolf, QSSTV, etc., pre-configured for the CubeSatSim on 434.9 MHz
- Power, keyboard/mouse, HDMI monitor
First-run setup:
- Turn the CubeSatSim on (start in BPSK mode).
- Plug the RTL-SDR, keyboard/mouse, and monitor into the ground-station Pi and power it. The OS loads (~10 s) and FoxTelem auto-starts.
- On first launch, FoxTelem asks for a profile — choose “CubeSatSim — AMSAT CubeSat Simulator.”
5. Decoding each mode
BPSK and FSK telemetry — FoxTelem
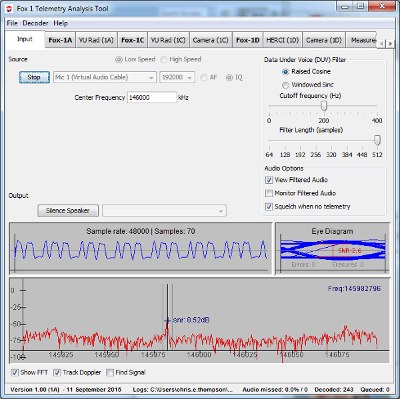
FoxTelem is the primary decoder for the two digital telemetry modes:2
- BPSK (Mode 3): FoxTelem auto-tunes ~434.9 MHz with Telem Format = “BPSK 1200bps (Fox1E).” Watch the Input tab — when the eye diagram “looks like an eye” and SNR is good, the frame count in the lower-left starts climbing. Switch to the CubeSatSim-BPSK tab to see decoded values; confirm “Telemetry Payloads Decoded” keeps increasing.
- FSK (Mode 2): click Stop, set Telem Format = “FSK 200bps (Fox1)”, then view the CubeSatSim-FSK tab. (Use File → Delete Payload Files to zero the counters for a fresh session.)
What the telemetry shows. FoxTelem’s Health/Measurements tabs display real engineering values — exactly the housekeeping a flight CubeSat reports: Radio (RSSI, TX antenna), Battery / Battery 2 (voltage, current), Computer Hardware (Pi temperature, bus), STEM Payload (BME280 temperature / pressure / altitude, MPU6050 IMU), and six solar-panel faces — ±X, ±Y, ±Z — each with voltage, current, rotation, and acceleration. Shade a face and watch its current drop in real time.
SSTV images — QSSTV / WebSDR
In SSTV (Mode 4), open QSSTV or the WebSDR app and pick the CubeSatSim preset (sets DIG → SSTV). Decoding starts when a new image transmission begins: the stored CubeSat image appears first; if a Pi Camera is fitted, subsequent frames show the live camera view.2
APRS packets — Direwolf / WebSDR
In APRS (Mode 1), run Direwolf or the WebSDR (preset to 434.9 MHz) and select “Packet” next to DIG — the APRS data and its waterfall signature appear.2
CW — OpenWebRX
In CW (Mode 5), open OpenWebRX and select the CW Decoder; you may need to offset slightly from center to lock the tone.2
Cross-Band Repeater — 2 m downlink
In Cross-Band Repeater (Mode 6), the sim relays a 70 cm uplink to a 2 m (≈144.9 MHz FM) downlink. In OpenWebRX choose the “RTL-SDR 2 m Ham Band 145 MHz (CubeSatSim Cross Band Repeater)” band and tune 144.9 MHz FM to hear anything transmitted on ~435 MHz (with default frequencies). See the project’s Cross-Band Repeater guide for details.2
6. A typical session
- Charge (Red LED), then pull the RBF pin → boots in ~30 s, CW ID “HI HI DE …”, Blue LED on.
- On the ground-station Pi, FoxTelem auto-tuned to 434.9 — set the right Telem Format for the mode.
- Cycle modes with the push-button blink-count: BPSK/FSK → telemetry tables; SSTV → images; APRS → packets; CW → Morse; CBR → 2 m relay.
- Shade the panels / warm a sensor and watch the live telemetry respond — the whole point of the simulator.
- Press-and-hold to shut down (Green slow-blink), then re-insert the RBF pin for storage.
7. Operating legally
Transmitting on 434.9 MHz over the air is amateur-band operation — license + station ID rules apply (Vol 2 §5). The sim’s CW “HI HI DE AMSAT default when you transmit. For the full envelope, see the cross-references in Vol 2 (../../Scanners_and_Radios/.../vol4.md, ../../Hack Tools/Antennas/.../vol31.md).
References
Footnotes
-
CubeSatSim Quick Start Guide (Mar 2022) — https://cubesatsim.org/download/cubesatsim-qsg.pdf (on/off/charge; LEDs; 434.9 MHz; “HI HI DE CALLSIGN”; five-mode blink table +
configcommands; SSTV = Scottie 2). ↩ ↩2 ↩3 ↩4 -
CubeSatSim Ground Station Quick Start Guide — https://cubesatsim.org/download/groundstation-qsg.pdf (ARISS Pi image; FoxTelem profile “CubeSatSim”; BPSK “1200bps Fox1E” + FSK “200bps Fox1” formats; eye diagram/frame count; SSTV via QSSTV/WebSDR; APRS via Direwolf; CW via OpenWebRX; Cross-Band Repeater mode 6 on 145 MHz; telemetry display: battery, STEM payload, ±X/±Y/±Z panels). ↩ ↩2 ↩3 ↩4 ↩5 ↩6 ↩7 ↩8